Saturday, April 17, 2010

Make me an offer cause Frida needs a home!


Frida needs a home! She's been homeless for quite some time well not exactly homeless but she's feeling pretty rejected. She's sick of staying here with me ;) Anyways if you like her and want her make me an offer I need to make some space around here.

A little about her:

"Feet, who needs them when I have wings to fly?" - Frida Kahlo

This piece is a 12 x 16 mixed media piece. I used ephemera, ranger adirondack ink, acrylics, beeswax, pen, conte crayon, oil pastels, stickers and more. It is covered with a thin layer of beeswax to seal it all so it has a nice scent as well. The flowers in her hair were cut out from a postcard from 1910. The original sketch of Frida that I collaged is my original sketch for my digital piece Frida I just painted over her. If you LOVE Frida like I do then you'll love this piece.

This piece will come with a (COA) certificate of authenticity signed by me. This will be shipped Priority mail out to you as well.

All rights reserved. All reproduction rights are retained by the artist. Unauthorized reproduction in any form is prohibited. All artwork and images are copyright Aimée Wheaton.

Friday, April 16, 2010

Bet you didn't know ...


I started a new Etsy shop. Yes I know I said I would cut back but this shop isn't really for me, it's for others. This came out of me wanting to help my friends and family in need. I have a lot going on on both sides of my family at the moment, people needing help and in financial difficulty. Major life changes are happening and we're not all sure we're ready for these things to happen. My art has kind of taken a back burner lately and I think this is one of the reasons why. I never have my own money when it comes to wanting to help others so I came up with the idea to make and sell jewelry and if it profits (I am praying it does) then I can help my loved ones. Every little bit helps right? I'm faithfully making jewelry in the evenings and spending time with my kiddo during the day. Next day if I can I post them in the shop and on my FB Fanpage. Please check it out when you get a chance. I've had one sale the second day my shop was running, boy was that encouraging! Another idea I had was to put one piece of art in this shop and the money would go towards a missionary friend I have who needs financial support. (still working on this one)
I've named my shop Impress 2 Bless. Please spread the word for me. I may do a giveaway from time to time on here as well. If you would like to donate old beads or anything jewelry related I would gladly welcome it and turn it into something new! Just let me know. You can follow me on Twitter as well @impress2bless

Deuteronomy 16:17: "All must give as they are able, according to the blessings given to them by the Lord your God."

Here are a few of my favorites in the shop now:

Monday, April 12, 2010

And the winner is!


I posted a giveaway last week for an original piece of art and picked the winner today!! I used Random.org for a little help. The number was 2! AnoneMoose!! I will be in touch for your address! Congrats! UPDATE: can you email me? I can't find any contact info for you.

Thanks for all the sweet comments all. I feel good about my decision. During this time though my spark for jewelry making came back so doing a bit of that with my daughter as well!

Wednesday, April 7, 2010

Can you hear the crickets?

You know the sound of those crickets in the summertime happily making their little noises after it's completely silent? Yeah kind of like my blog has been, silent and quiet. Not much has been going on my little art world. Life is rapidly changing all around me and I haven't been feeling inspired at all. Insert cricket sound here. Well after much thought I am taking an art hiatus, as if you didn't know that by the silence right? I was trying to balance mommyhood and my art "career" and just can't at the moment. My sweet daughter is taking up most of my time and we're having fun together and strengthening our relationship on a daily basis. I've gotten more hugs and kisses and random "I love you"s than I ever have gotten from her. She needs me and I cherish this time together. Sales have been way down and I have to admit I'm a little discouraged. I see all my cool artsy friends moving on with their careers, writing books, holding classes and selling a ton, I have to admit I'm a little jealous but I'm not at that point right now. I'm happy for them all but wish I could be a part of that world right now. The timing isn't right and I know it will be at another time just not right now.

Life at home has been nutso I've been a decluttering fool and that includes my art supplies and mixed media stuff galore! Last night I made 5 mixed media grab bags full of goodies! I'm selling them on Etsy and they are chock full of stuff! Check them out if you need a boost in your stash and little extras!


I've decided to have a little giveaway on here as well. I made this piece for Valentine's Day but will give it away to one lucky winner. All you have to do is leave a comment on here and I will pick a random winner using random.org next Monday.

Thanks for reading! As I write this I'm reminded of this scripture:

Job 1:21 (KJV)

"21... Naked came I out of my mother's womb, and naked shall I return thither: the LORD gave, and the LORD hath taken away; blessed be the name of the LORD."

Monday, March 8, 2010

Bad Girls Project 52 - Challenge 11 Gods/Goddesses

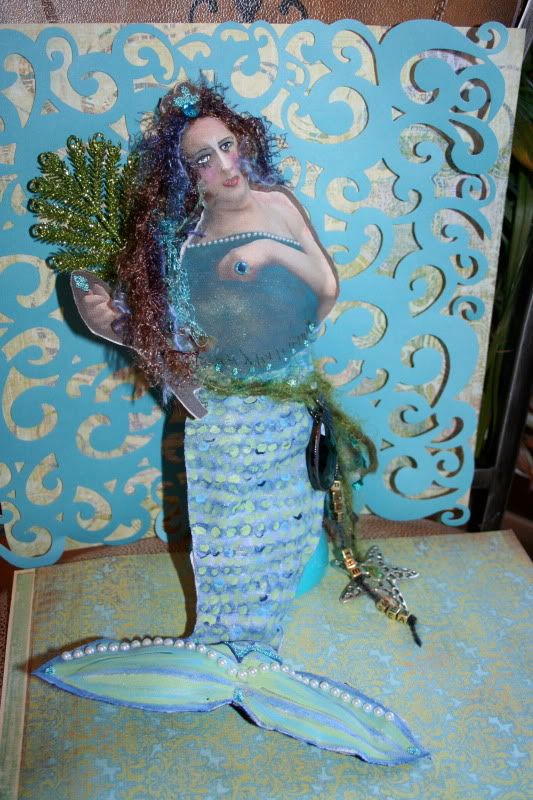
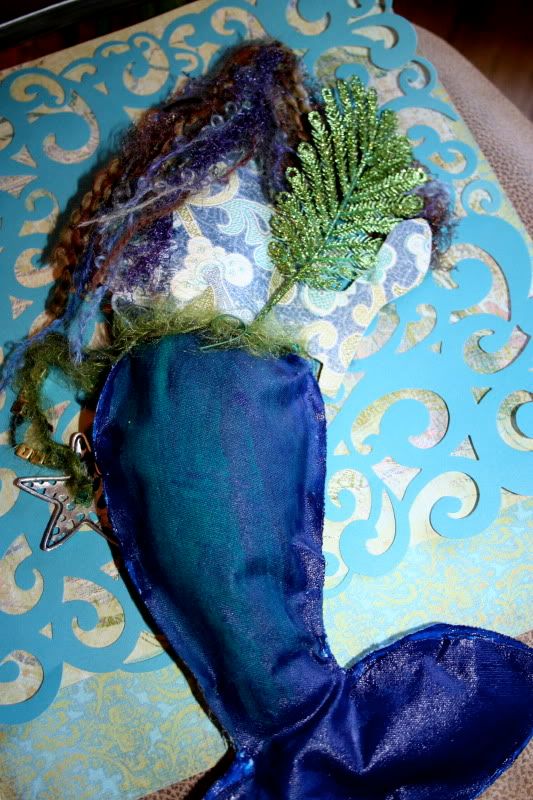
Meet the Sea Goddess!


Challenge 113-D Figure (jointed, pattern, stuffed, simple/complicated, on stand, wall display, sitting, painted, glued, stitched, very open options, etc…)
Theme – Gods & Goddesses (human, animal, cultural myth, invented, etc…)
Required material – Fibers (ribbon, yarn, string, lace, floss, cord, etc…)

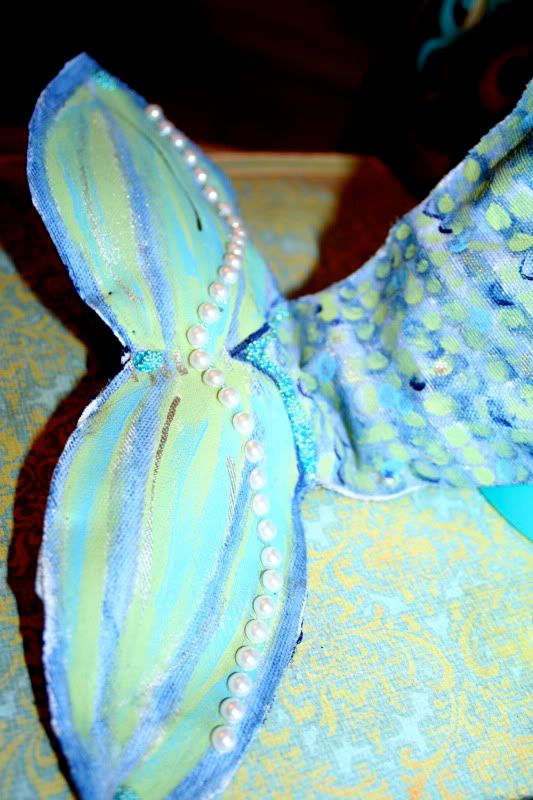
All I can say about this piece is that it definitely was a challenge to me. I had the concept in my head but wasn't sure how to go about creating it since I can't sew!! I did my best and that's all that matters, right? Since I can't sew I was stumped. Then I had an epiphany on how I was going to create a "stuffie" so to speak. I remembered an issue of Stuffed Magazine where Claudine Hellmuth demonstrated an easy piece of art using her Sticky Back Canvas. So that's what I did! I cut out her tail and started drawing on it with the neocolors to create scales and then went back over it with water to soften it. When that was dry I painted extra acrylic over it. I found the vintage image of the top of the mermaid's body and printed it out on the sticky backed canvas and from there just started cutting and creating the rest of the mermaid. This mermaid is definitely the American-sized one! LOL I didn't mean to make her so large she just turned out that way. I had some batting from a cheap pillow and stuffed her right up!

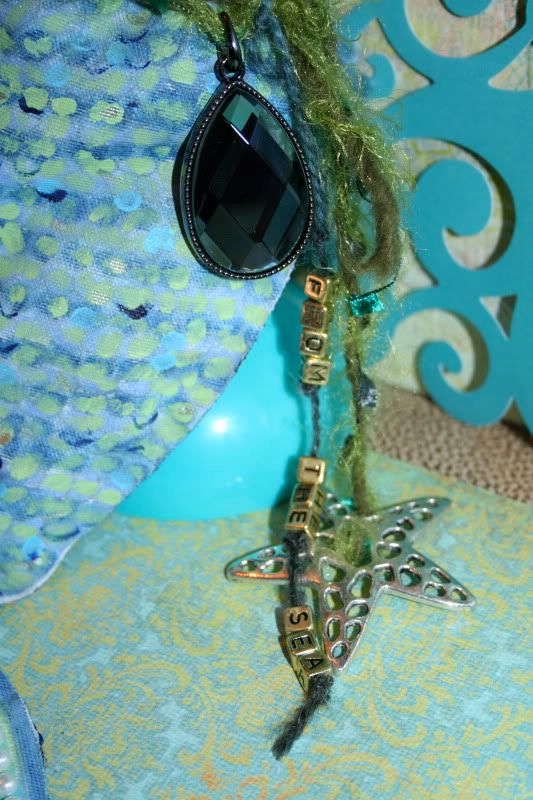
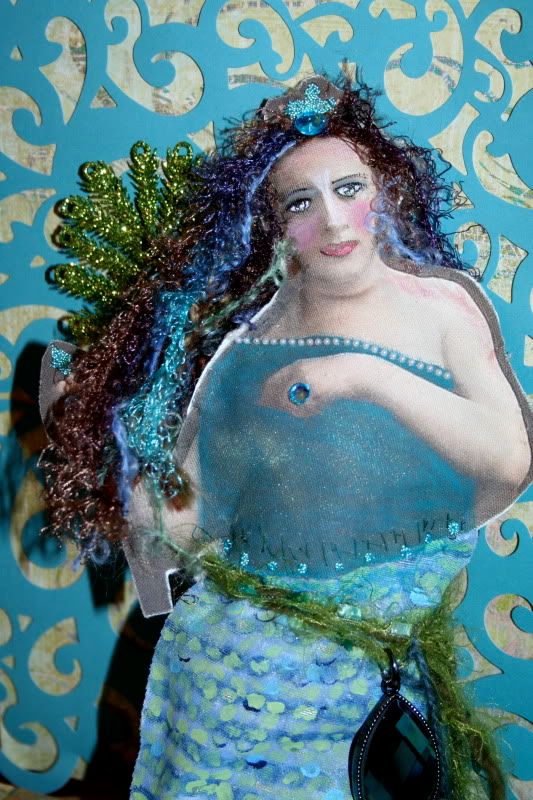
My concept worked mostly but then I realized I had to sew the top of the body (printed part) to the lower part, I hand stitched it and got lots of cuts! Once that was accomplished I started to piece her together slowly. Instead of painting the back of her (top) I used colorful/matching paper to add more texture and detail. The hardest part of this piece was making sure she stayed together and that's where the pins came in. I glued (with gel medium) her up all around the edges because the sticky part of the canvas wasn't enough to hold it all with the batting. Once glued I pinned her up like a pattern would be and let it dry for quite some time. This piece was constantly needing to be reinforced (PATIENCE)!! Once she was put together I started embellishing and painting. The embellishing was the most fun. I found jewelry findings that fit my theme and just started playing around. I painted in her face and added more details, glued on the fibers for her hair and even gave her a sparkly ring! The options are endless. Just have fun in the process and remember to stay patient if you try this at home. I was super frustrated and uninspired at times but I think the outcome was worth it! What do you think?? If you have any questions feel free to ask me!

Supply List:

Claudine Hellmuth Sticky Back Canvas Size 12 x 12
sewing pins
needle/(heavy duty) thread
scrapbooking paper
fibers for hair and belt
digital vintage image to print on the canvas
stick on pearls
Martha Stewart Luster Glass Microbeads in Feldspar
Stick on gems
Pearl Ex
Sparkly glitter glue, used an aqua color
Acrylics - I used Claudine Hellmuth Studio paints and Steward Gill Byzantia paint
Black pen for details
Caran d'ache Neocolor crayons for the mermaid scales
paint brush
jewelry findings
Golden Gel Matte Medium
batting
Left over Christmas Ornament
LOTS of PATIENCE!!!!

NOW IT'S YOUR TURN TO CREATE!!! GO CREATE SOMETHING AMAZING!!!! I hope I inspired you!


Official Rules:

The winner of this challenge will receive a $20 Gift Card to shop like a Bad Girl in the Bad Girl Shoppe! Be sure to leave a blog comment here first!

Three Rules to Follow:
  1. Follow the challenge guidelines exactly
  2. Post your project in the specific "Project 52" gallery with the title "Challenge #11 - 3D Figure" before March 20th Midnight Pacific Time
  3. Link your layout to the Challenge #11 Thread in the Project 52 forum

Monday, February 8, 2010

Bad Girls Challenge 9 Wood Blank


Seeing all the leftover Christmas decorations at Michael's got me started on this project. I think I paid 11 cents each for the silver leaves and fillers on the tree. This piece has lots of depth because of it. First off I knew I wanted to use some of my tree images I took a few years back to help the background pop. {1} I painted the 12 x 12 piece of wood with gesso to get rid of the brown of the wood and so it would have more tooth. {2} When that was dried I did an image transfer (I wanted to do my own tutorial for you but ran out of time, I do apologize) using Golden't gel matte medium with my images. Gel transfers are super easy you just have to have patience for them. Spread a layer on where you want to place the images you're transferring in my instance the trees. Place them face down onto the gel medium and let it sit overnight, make sure it's smooth and even. {3} The next day you will take your spray bottle and completely drench the paper (images) and start peeling up the layers of paper and you'll have the image left on the board! I didn't have the entire bottom of the trees so I had to draw and colors those in to blend so it looked real. I used my general's pencil as well as the caran d'ache neocolor crayon. {4} Once the board was dry I painted on a thin glaze of Payne's grey acrylic blended with the golden glazing solution. This is better then diluting it with water, gives it a more consistant layer. Payne's grey always reminds me of winter, it's bluish gray and perfect for this piece. {5} Once that had dried I gave the board some texture or snow as I call it. I created the main tree base with the light molding paste, I spread it on with an old burnisher to make it uneven and have ridges. I also added some to the bottom of the board for snow piles. Let this dry, if it's thin it will dry fast if it's super thick let it dry overnight. {6} Once dry I started ripping apart the Christmas ornaments, they are all on their own wires so I could bend them and place them where I wanted. I started layering them using the clear glue. Let that dry flat and overnight. {7} Next take the bridal garland and start snipping off the pieces you like and place where you like on the tree or below with glue. Let that dry. {8} Add some glue to the areas you want to glimmer with glass and sprinkle on the glass flakes. Let that all dry. {9} Next comes the embellishing, I used and opaque white pen to draw swirls all over, I added the snowflake pendant/charm to the tree so it dangled, I added the Jolee flat snowflakes placed with glue. Next I took the green distress ink and went around the edges of the quote. Lastly I placed the bird. Both the bird and quote were glued with the gel medium and glazed over with it. Once that was dry I traced around it with the sketch n wash pencil. Voila you have a gorgeous winter scene! Super easy!!


What you'll need:


12 x 12 Wood blank (purchased at Michael's)
Gesso
Golden Gel Medium Matte
Print out's of trees for background (will be used in image transfer)
Golden Light Molding Paste
acrylics ( I used Golden's Payne's grey, white), also used Claudine Hellmuth's light blue paint
Jolee's (snowflakes)
snowflake pendant
Christmas decorations (all the silver and leaves in the tree) they were on clearance at Michael's.
Bridal wire garland for the white flowers, heart and clear beads
White glass glitter for the shimmer on the snow (glass flakes)
Distress ink in green for around the quote
favorite quote
bird printout
clear glue
Caran d'ache Neocolors for the tree colors, chose sepia
General's sketch n wash pencil
White opaque gel pen
foam brush
Golden glazing solution
spray bottle of water

Official Rules:

The winner of this challenge will receive a $20 Gift Card to shop like a Bad Girl in the Bad Girl Shoppe! Be sure to leave a blog comment here first!

Three Rules to Follow:
  1. Follow the challenge guidelines exactly
  2. Post your project in the specific "Project 52" gallery with the title "Challenge #9 - Wooden Blank" before February 27th Midnight Pacific Time
  3. Link your layout to the Challenge #9 Thread in the Project 52 forum

Tuesday, February 2, 2010

Let's keep things simple!

Hey all.

Just thought I'd share a few things with you. I am considering closing my ArtFire shop to simplify things this year. The only sales I've had on there are from friends who I've directed there, nobody random. I LOVE ArtFire and the perks it has with the verified account but my hands are in too many pots so to speak. I have to update so many sites, blogs included. Why not make my life a teensy bit easier. I haven't decided yet but I know I need to simplify somehow. I've had more success on Etsy but I've been on there longer. I would love your thoughts.

Next I've added 12 new items to my Etsy shop and they're all originals!! These are not 40% off because they're new for 2010. Various price levels and perfect little gifts. Check them out in my new section here.

Nextly two of my very talented artsy friends are having a little workshop at the Purple Cottage. If I could I'd be there. If you live in FL it would be an easy class for you to get to. Check it out! I'll leave a link in my sidebar as well! This is the first of many I'm sure! I took Carmen's Spill It Class online and I LOVED it!

Art and Dreams Button

Feel free to share or post this link on your blog as well.

My oodles and oodles of supplies came from Dick Blick last week!! Ready to start on some new series just have to find the time. I hope this year I'll knock your socks off with new art. Trying to freshen things up!! Speaking of that, remember everything but my new section in my Etsy and ArtFire shops are 40% off! Yes everything, till it's all gone!

One last thing, my little newsletter I had started last year that I have 20 subscribers to now, yeah that's one of the things going bye bye since I can't remember to update that. So you heard it from me first, my blog will be my updating hub. If I have news I'll share it here and also on my FB fan page (link is on the right) If you're on FB that's updated often.

Ok so this is a PS - I am sooooo excited to share and show you my latest Bad Girl creation. It will go live next Monday 12AM PST. Be on the lookout for it, you won't want to miss it. Once that's posted it will be for sale as well. If you're interested when you see it let me know!

That's it! Hope you have a fantabulous week!!

MAZER!

LinkWithin

Related Posts with Thumbnails