Showing posts with label bad girls 52 project. Show all posts

Monday, March 8, 2010

Bad Girls Project 52 - Challenge 11 Gods/Goddesses

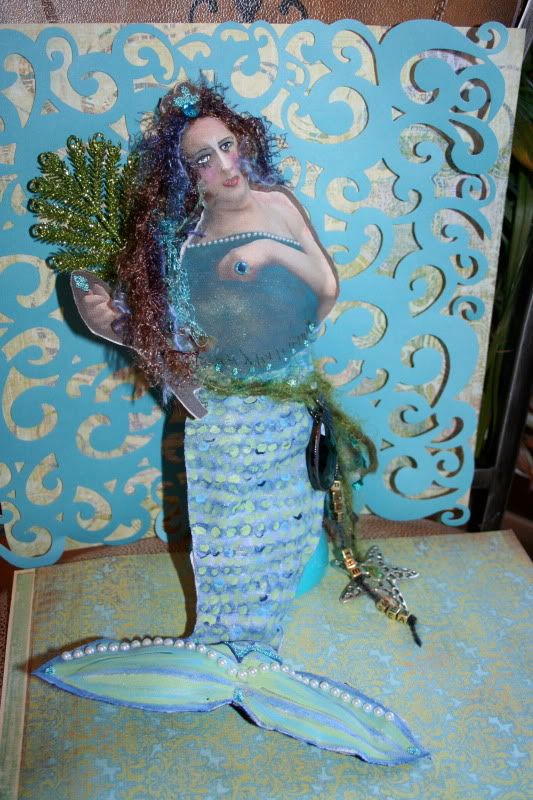
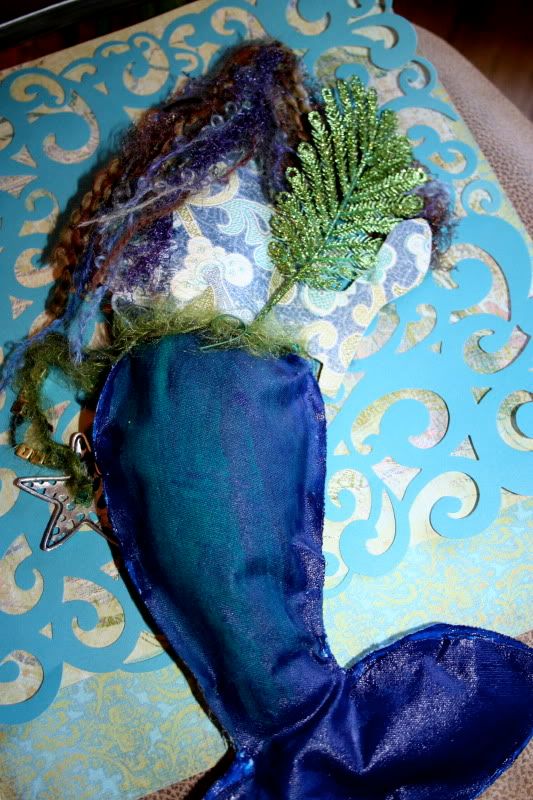
Meet the Sea Goddess!


Challenge 113-D Figure (jointed, pattern, stuffed, simple/complicated, on stand, wall display, sitting, painted, glued, stitched, very open options, etc…)
Theme – Gods & Goddesses (human, animal, cultural myth, invented, etc…)
Required material – Fibers (ribbon, yarn, string, lace, floss, cord, etc…)

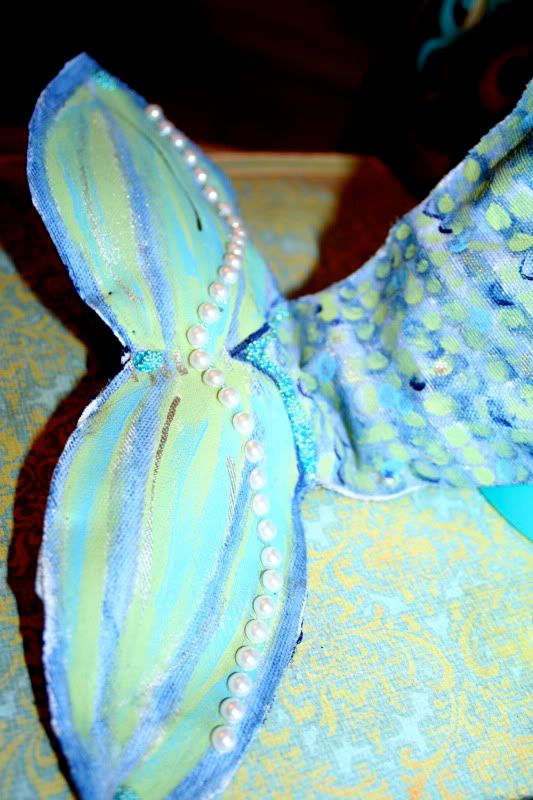
All I can say about this piece is that it definitely was a challenge to me. I had the concept in my head but wasn't sure how to go about creating it since I can't sew!! I did my best and that's all that matters, right? Since I can't sew I was stumped. Then I had an epiphany on how I was going to create a "stuffie" so to speak. I remembered an issue of Stuffed Magazine where Claudine Hellmuth demonstrated an easy piece of art using her Sticky Back Canvas. So that's what I did! I cut out her tail and started drawing on it with the neocolors to create scales and then went back over it with water to soften it. When that was dry I painted extra acrylic over it. I found the vintage image of the top of the mermaid's body and printed it out on the sticky backed canvas and from there just started cutting and creating the rest of the mermaid. This mermaid is definitely the American-sized one! LOL I didn't mean to make her so large she just turned out that way. I had some batting from a cheap pillow and stuffed her right up!

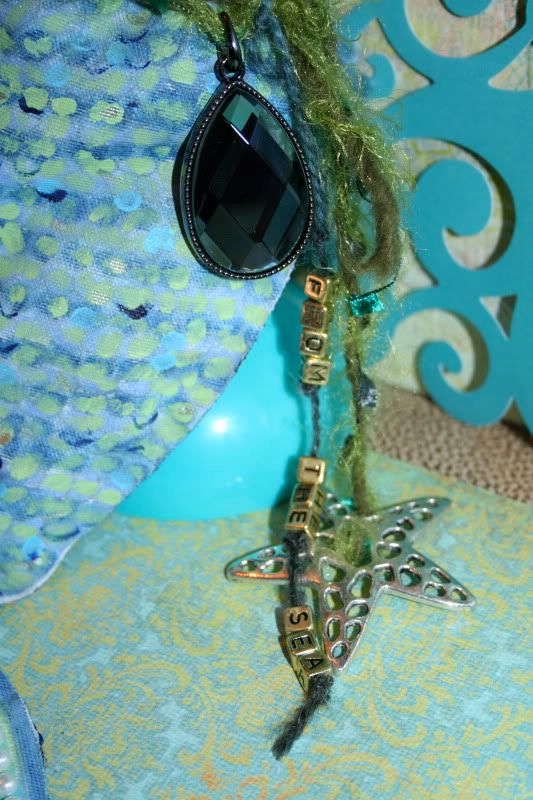
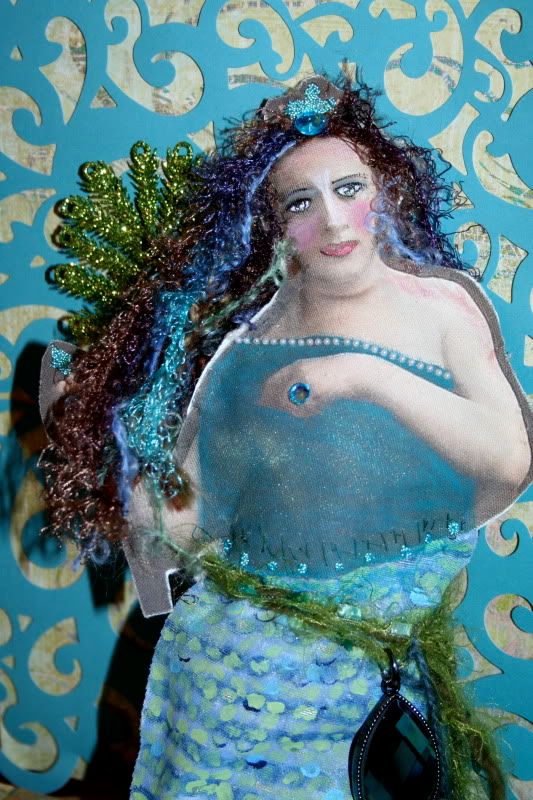
My concept worked mostly but then I realized I had to sew the top of the body (printed part) to the lower part, I hand stitched it and got lots of cuts! Once that was accomplished I started to piece her together slowly. Instead of painting the back of her (top) I used colorful/matching paper to add more texture and detail. The hardest part of this piece was making sure she stayed together and that's where the pins came in. I glued (with gel medium) her up all around the edges because the sticky part of the canvas wasn't enough to hold it all with the batting. Once glued I pinned her up like a pattern would be and let it dry for quite some time. This piece was constantly needing to be reinforced (PATIENCE)!! Once she was put together I started embellishing and painting. The embellishing was the most fun. I found jewelry findings that fit my theme and just started playing around. I painted in her face and added more details, glued on the fibers for her hair and even gave her a sparkly ring! The options are endless. Just have fun in the process and remember to stay patient if you try this at home. I was super frustrated and uninspired at times but I think the outcome was worth it! What do you think?? If you have any questions feel free to ask me!

Supply List:

Claudine Hellmuth Sticky Back Canvas Size 12 x 12
sewing pins
needle/(heavy duty) thread
scrapbooking paper
fibers for hair and belt
digital vintage image to print on the canvas
stick on pearls
Martha Stewart Luster Glass Microbeads in Feldspar
Stick on gems
Pearl Ex
Sparkly glitter glue, used an aqua color
Acrylics - I used Claudine Hellmuth Studio paints and Steward Gill Byzantia paint
Black pen for details
Caran d'ache Neocolor crayons for the mermaid scales
paint brush
jewelry findings
Golden Gel Matte Medium
batting
Left over Christmas Ornament
LOTS of PATIENCE!!!!

NOW IT'S YOUR TURN TO CREATE!!! GO CREATE SOMETHING AMAZING!!!! I hope I inspired you!


Official Rules:

The winner of this challenge will receive a $20 Gift Card to shop like a Bad Girl in the Bad Girl Shoppe! Be sure to leave a blog comment here first!

Three Rules to Follow:
  1. Follow the challenge guidelines exactly
  2. Post your project in the specific "Project 52" gallery with the title "Challenge #11 - 3D Figure" before March 20th Midnight Pacific Time
  3. Link your layout to the Challenge #11 Thread in the Project 52 forum

Monday, February 8, 2010

Bad Girls Challenge 9 Wood Blank


Seeing all the leftover Christmas decorations at Michael's got me started on this project. I think I paid 11 cents each for the silver leaves and fillers on the tree. This piece has lots of depth because of it. First off I knew I wanted to use some of my tree images I took a few years back to help the background pop. {1} I painted the 12 x 12 piece of wood with gesso to get rid of the brown of the wood and so it would have more tooth. {2} When that was dried I did an image transfer (I wanted to do my own tutorial for you but ran out of time, I do apologize) using Golden't gel matte medium with my images. Gel transfers are super easy you just have to have patience for them. Spread a layer on where you want to place the images you're transferring in my instance the trees. Place them face down onto the gel medium and let it sit overnight, make sure it's smooth and even. {3} The next day you will take your spray bottle and completely drench the paper (images) and start peeling up the layers of paper and you'll have the image left on the board! I didn't have the entire bottom of the trees so I had to draw and colors those in to blend so it looked real. I used my general's pencil as well as the caran d'ache neocolor crayon. {4} Once the board was dry I painted on a thin glaze of Payne's grey acrylic blended with the golden glazing solution. This is better then diluting it with water, gives it a more consistant layer. Payne's grey always reminds me of winter, it's bluish gray and perfect for this piece. {5} Once that had dried I gave the board some texture or snow as I call it. I created the main tree base with the light molding paste, I spread it on with an old burnisher to make it uneven and have ridges. I also added some to the bottom of the board for snow piles. Let this dry, if it's thin it will dry fast if it's super thick let it dry overnight. {6} Once dry I started ripping apart the Christmas ornaments, they are all on their own wires so I could bend them and place them where I wanted. I started layering them using the clear glue. Let that dry flat and overnight. {7} Next take the bridal garland and start snipping off the pieces you like and place where you like on the tree or below with glue. Let that dry. {8} Add some glue to the areas you want to glimmer with glass and sprinkle on the glass flakes. Let that all dry. {9} Next comes the embellishing, I used and opaque white pen to draw swirls all over, I added the snowflake pendant/charm to the tree so it dangled, I added the Jolee flat snowflakes placed with glue. Next I took the green distress ink and went around the edges of the quote. Lastly I placed the bird. Both the bird and quote were glued with the gel medium and glazed over with it. Once that was dry I traced around it with the sketch n wash pencil. Voila you have a gorgeous winter scene! Super easy!!


What you'll need:


12 x 12 Wood blank (purchased at Michael's)
Gesso
Golden Gel Medium Matte
Print out's of trees for background (will be used in image transfer)
Golden Light Molding Paste
acrylics ( I used Golden's Payne's grey, white), also used Claudine Hellmuth's light blue paint
Jolee's (snowflakes)
snowflake pendant
Christmas decorations (all the silver and leaves in the tree) they were on clearance at Michael's.
Bridal wire garland for the white flowers, heart and clear beads
White glass glitter for the shimmer on the snow (glass flakes)
Distress ink in green for around the quote
favorite quote
bird printout
clear glue
Caran d'ache Neocolors for the tree colors, chose sepia
General's sketch n wash pencil
White opaque gel pen
foam brush
Golden glazing solution
spray bottle of water

Official Rules:

The winner of this challenge will receive a $20 Gift Card to shop like a Bad Girl in the Bad Girl Shoppe! Be sure to leave a blog comment here first!

Three Rules to Follow:
  1. Follow the challenge guidelines exactly
  2. Post your project in the specific "Project 52" gallery with the title "Challenge #9 - Wooden Blank" before February 27th Midnight Pacific Time
  3. Link your layout to the Challenge #9 Thread in the Project 52 forum

Monday, January 4, 2010

Bad Girls Challenge # 7 - Insect Shadow Box


Challenge 7 – Shadow Box (good size, found, cigar, repurposed, purchased, etc…)

  • ThemeInsects (butterflies, bees, spiders, moths, mantis, caterpillars, etc…)
  • Required material Fabric (velvet, cotton, felt, lace, old/new, antiqued, etc…)

I really enjoyed this project! I was stumped at first and was going to do a piece with a bee in it but it just wasn't coming together. So I went on another search for a theme and decided upon a butterfly theme when I saw the butterfly ornament at Michael's! After finding the focal point I then perused their scrapbook paper and found the perfect paper, from that point on it just came together for me! Serves me right for buying everything ahead of time when I wasn't set on a theme. Anyways this is super easy.

First off paint your box with gesso if it has a busy background or you want a bit more texture to your piece. Since my box was a cigar box it had very ornate art on it. Let dry. Then choose your paint color and paint the outside and partial inside so no white shows. Measure out your shadow box/cigar box on the inside and cut the paper to fit. I used 2 coordinating papers, one for the sides and one for the background. Glue them down with your glue stick. When that is dry you can now add your focal point where you want it (butterfly). I used the E6000 glue because it had a clip on the back of it. Also on the way home my butterfly was put in the bag with something heavy and was slightly crushed so I had to put it back together. Next I glued on my trim with regular tacky glue but in clear. Next came the cute little flowers! Just glue those babies on! I wanted this piece to look like it could stand alone so I decided to add the knobs on the bottom to give it some height. First I painted the knobs a darker purple (2 coats) and when those were dry I glued them to the bottom with the E6000 glue as well. I let that sit overnight to be sure it was dry. Next was the embellishments, I gathered a bunch of tulle and wrapped some silver craft wire around it so it would keep it's shape. Once I was happy with the shape I added more E6000 to the top and took some sewing pins to hold it in place. When that was dry I pinned an old brooch to the front of it for extra class. I decided the sides needed some glitz so I applied some gold glitter. Next I sprayed it with fixative to keep them in place. Just a little though you don't want to drown the piece. Still wasn't totally happy so I added the little polka dots to the knobs and swirled around the dots with gold gel pen. Last but not least I used the word "Papillon" French for butterfly and a little butterfly sticker next to it. Et voila it's done!

Supply list:
  1. Cigar box ( I have a few lying around, used to buy them from the antique book shop)
  2. Gesso
  3. Making Memories Tiny Alpha's
  4. Christmas ornament (Butterfly) These are super cheap now!
  5. Lara's Crafts Doll Head/knob (3 for the base) 1 1/4" found these in the wood craft section of Michaels.
  6. Acrylics - I used Claudine Hellmuth's purple paint, dark purple & white for the dots on the knobs.
  7. Glitter (gold)
  8. Coordinating scrapbook paper
  9. Paper cutter
  10. Tulle (fabric on top)
  11. Found objects (gold brooch on top)
  12. E6000 glue for the knobs
  13. Silver craft wire
  14. Sewing pins to hold the tulle in place at the top
  15. Fabric Fancies Flowers in champagne/gold
  16. Trim (I purchased mine in the Bad Girls shop)
  17. Tacky glue
  18. Gold gel pen
  19. Glue stick to glue down the paper
  20. Fixative to finish the outside and hold the glitter on.
Official Rules:

The winner of this challenge will receive a $20 Gift Card to shop like a Bad Girl in the Bad Girl Shoppe! Be sure to leave a blog comment here first!

Three Rules to Follow:
  1. Follow the challenge guidelines exactly
  2. Post your project in the specific "Project 52" gallery with the title "Challenge #7 - Shadow Box" before January 16 Midnight Pacific Time
  3. Link your layout to the Challenge #7 Thread in the Project 52 forum

Monday, December 7, 2009

Bad Girls Project 52 Challenge #5 - ATC's

Hello all you Bad Girls!

Some of you may not know what an ATC is so here is some useful info for you! Taken straight from Wikipedia:

Artist Trading Cards
(or ATCs) are miniature works of art about the same size as modern baseball cards,[1] or 2 ½ X 3 ½ inches (6cm X 9cm),[2] small enough to fit inside standard card-collector pockets, sleeves or sheets.[3] The ATC movement developed out of the mail art movement and has its origins in Switzerland.[4] Cards are produced in various media, including dry media (pencils, pens, markers, etc), wet media (watercolor, acrylic paints, etc), paper media (in the form of collage, papercuts, found objects, etc). The cards are usually traded or exchanged rather than sold. To view more of the article, click here.

I have my own collection of ATC's I've been adding to for years. Some are framed and others are in an album. These are sooo fun and so addicting.

Art Tip: You know all those little bits of scraps and papers I told you to hang on to? Well they are perfect for little art pieces!! I save everything and use them in my ATC's.

Another cool tip is that your standard card from a card deck is the right size as well. Take an old card deck and glue your art right on top, paint on top or collage on top. I used to buy old decks from the antique shop for this purpose. Make sure they are the right size though.

OK onto my photos of this project! I chose the "Life" theme.

All 4!

"Life is Love"

"Life is Friends"

"Life is Mysterious"

"Life is Funny"

What I did on the backs of the cards.


Challenge #5 supply list


1. Strathmore ATC Canvas Paper - precut so it makes it easy
2. Scrapbooking paper of choice
3. Vintage image downloads - I purchased mine from French Kissed.
4. Tattered Angels Glimmer Glass "Regal" in Creme de Rouge -(transparency) purchased from Wendy Rago's shoppe
5. Gold Pearl Ex Powder
6. Q-Tip for applying the Pearl Ex
7. Scotch Craft Stick (glue)
8. Tim Holtz Distress Ink in "Peeled Paint" - green
9. Golden Fluid Acrylics, "Quinacridone Crimson"
10. General's Sketch & Wash Pencil - a must!
11. Peach colored pencil
12. Cricut Personal Cutter - not a must have but I used this to create the different shapes with the paper

Tutorial:


These are really easy to create and make great gifts for people. The only rule in making ATC's is to make sure you have them the correct size at 2.5" x 3.5" and the rest is up to your creativity. I really had a hard time with this project which is so ironic. I was over thinking them and sometimes the most simplest design is the best! I chose the "Life" theme and wanted to show various aspects of life. "Life is Friends", "Life is Love", "Life is Funny" & "Life is Mysterious". When I knew what I was looking for I went on a hunt for the perfect vintage photos for this project. I found them and they just came together! First I took my ATC paper and applied a thin layer of acrylic paint with my fingers, next I cut the various shapes using my Cricut Cutter that I wanted in the scrapbook paper. Glued them down the way I wanted them, trimmed the images to fit the way I wanted, glued them and found my transparencies that I thought fit and glued them. Next I applied the Pearl Ex with the Q-Tip to add some glimmer I chose gold. I traced the main image with the Sketch & Wash Pencil to make it stand out, I also traced the flower, heart and other paper. I then colored in the cheeks on the images to make them rosy with the colored pencil. Last but not least I went around the edges with the Tim Holtz Distress ink to frame the images. To finish off the ATC's I added another piece of paper to the back to make it more stiff as well as to add color. I cut out another shape and titled, signed and dated each one. Have fun with this and happy ATC trading, they really are little treasures!

OFFICIAL RULES

The winner of this challenge will receive a $20 Gift Card to shop like a Bad Girl in the Bad Girl Shoppe! Be sure to leave a blog comment here first!

Three Rules to Follow:
  1. Follow the challenge guidelines exactly
  2. Post your project in the specific "Project 52" gallery with the title "Challenge #5 ATC's" before December 19 Midnight Pacific Time (see time converter)
  3. Link your layout to the Challenge #5 Thread in the Project 52 forum

Challenge 5 – ATCs (4 minimum, series/not, traditional size, foldable extensions)

  • ThemeLife &/or Death (funky and dark, light and bright, etc…)
  • Required material Transparencies (part/whole, printed/painted/inked, etc…)


Till next time!

Aimée

Thursday, October 29, 2009

ATTN Bad Girls Fans! Challenge # 2 is posted!!

I'm a little behind on this post due to traveling but here you go! :)

Check out these great pieces from our design team!

Wendela's piece.
Jaz's piece
Katie's piece
Francesca's piece
Pam's piece
Anna's piece

FULL RULES

CHALLENGE #2
Old Text Book Cover (re-purposed, strong, older is better)
* Theme – School (education of any kind/lessons learned, etc…)
* Required material – Office Supply/s (any office supply store items are game)

It is your challenge to alter an old text book cover, use the theme school,/education and you must incorporate office supplie(s). The deadline is November 7, 2009 Midnight Pacific. Discuss in the Project 52 Forum.- Upload to the Bad Girls Project 52 Gallery.

WINNER WILL BE OUR NOVEMBER GUEST DESIGNER!!! ANNOUNCED Tuesday, November 10th, 2009

Instructions:

1. Upload to Your Photoserver Like Photobucket Our Project 52 Blinkie, Then Add It to Your Blog Linking Back To This Blog

2. After Your Blinkie Is Up, Leave Us a Comment On This Blog Post With The Link Where We Can Find It

3. Create Challenge #2 & Upload It to the Project 52 Gallery before November 7th Midnight Pacific

4. Come to the Project 52 Forum and Link Us to Your Project in the Gallery

Come say Hi to the Design Team and View Bonus Tutorials in the Forum today!

Wednesday, September 23, 2009

I always knew I was a bad girl!!


I'm proud to announce I am part of the Bad Girls Design Team!!!!!

This was the announcement on their blog:

Please WELCOME our new Design Team gals!

All good things come to those who wait... And, the waiting is over!

So, please join me and put your virtual hands together to welcome our new FABULOUS designers...


Pam Colosimo

Jaz Lee Soo Hui

Anna Dąbrowska-Pękocka

Kathryn Johnson

Wendela Lam

Katie Turner

Julie Ann Shahin

Francesca Di Leo

Tania Davey

•••••••Aimée Wheaton •••••••

Look for lots of exciting things to happen RIGHT HERE over the next few weeks... the new DT's bios, headshots, the FIRST CHALLENGE (WOO-HOO!!!!!!!), and much much MORE!

CONGRATS again ladies... And, WELCOME!!!!!!

LinkWithin

Related Posts with Thumbnails